ROS SDK User Guide
ROS-SDK
Installing ROS Packages
Tip
Supported ROS versions:
Ubuntu 20.04
- ROS1: Noetic
- ROS2: Foxy, Galactic
Ubuntu 22.04
- ROS2: Humble, Iron
Note, Ubuntu 18.04 version is not supported. Use docker to run a newer Ubuntu if you just have to.
Warning Note, before downloading the package, you need to have ROS installed and source the version you need to use. Otherwise, the downloaded package will not be usable.
In the path where you want to install the SDK, open the terminal and enter the following command:
wget -O hextool.bash https://ros.dl.hexmove.cn/ros.dl/hextool.bash && bash hextool.bash
Tip To prevent typos when typing commands, it is recommended to use the browser that comes with Ubuntu to open this website and copy the command from the browser to the terminal.
This is an EXAMPLE, installing the orcs-diff sdk.
PLEASE SELECT the correct SDK according to what you have purchased.
- Tool selection, choose
1: Download SDK
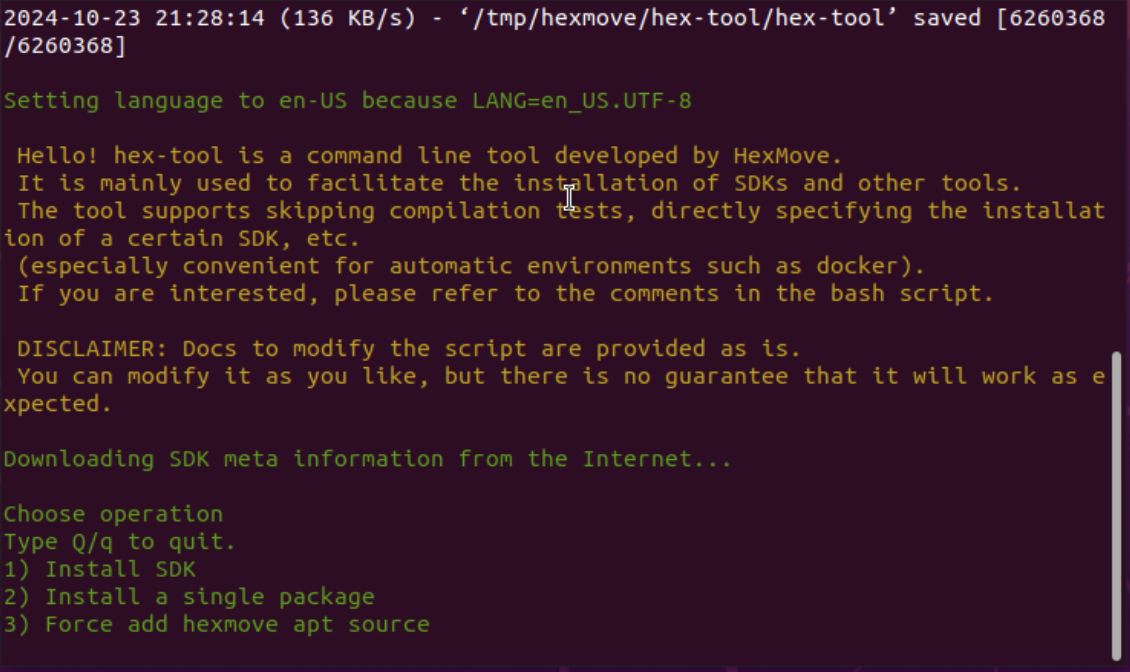
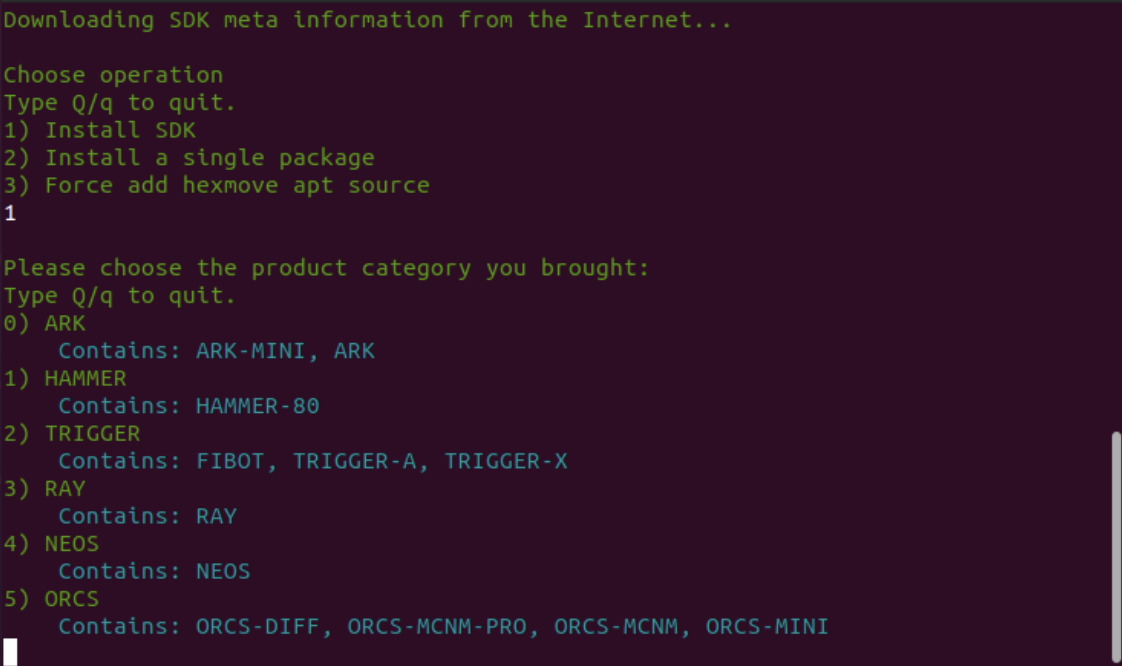
- SDK selection, choose the SDK you want to download. Please select according to the product you actually purchased. Here is an example with ORCS-MCNM.


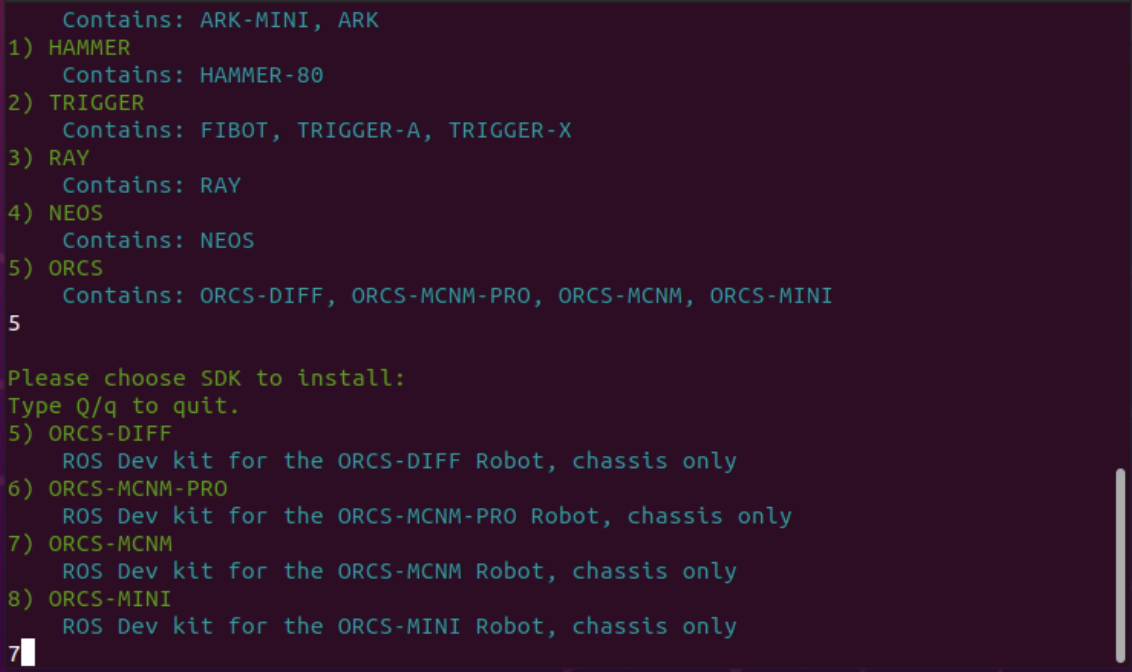
- Confirm the location of the new folder is correct

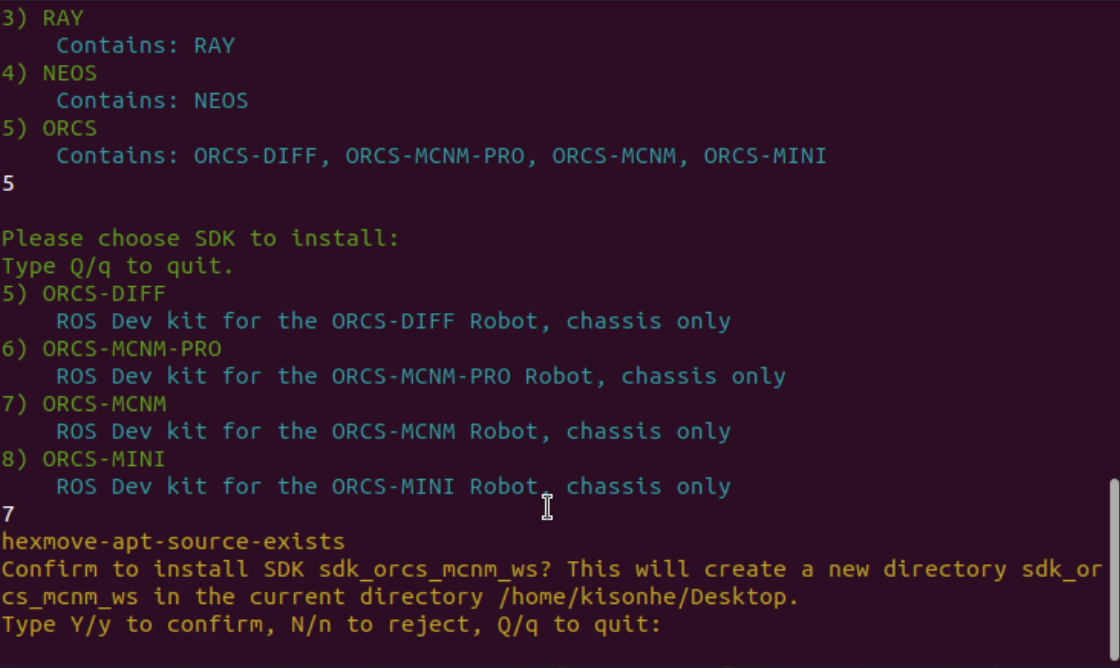
- Enter the password to complete the installation(because script needs to run things like apt-get install xxx). Script will do compile test.

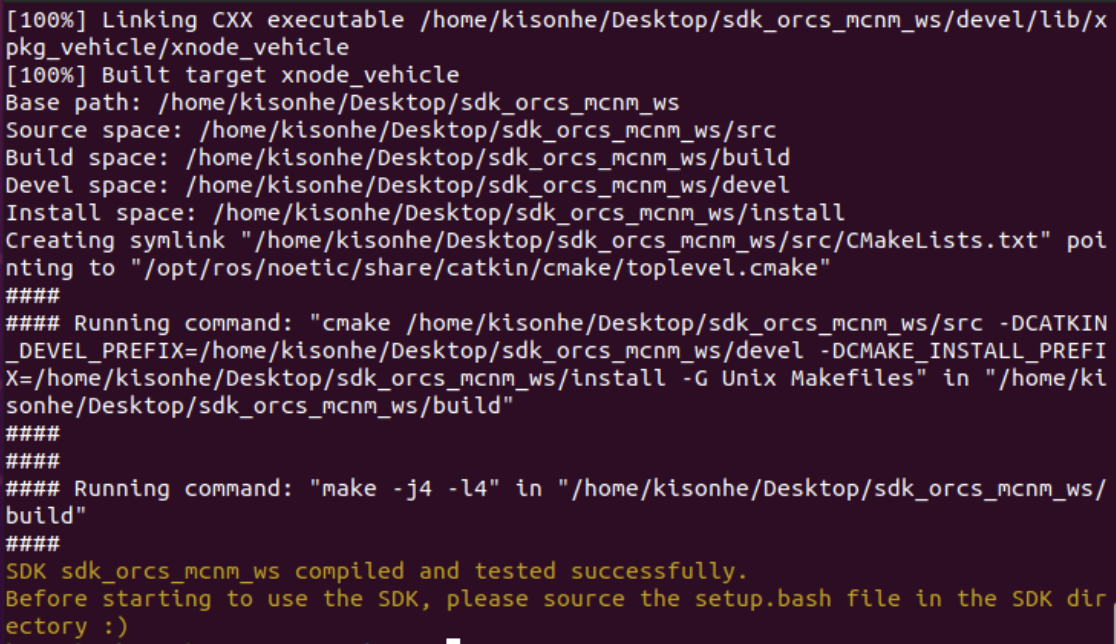
SDK Package Structure Description
The packages are similar, here is an example with ORCS-DIFF.
root@1c2edac84f0b:~# tree -d -L 5
.
└── sdk_orcs_diff_ws
    └── src
        ├── demo
        │   └── demo_general_chassis
        │       ├── demo_vehicle
        │       └── tools
        └── drivers
            └── xpkg_vehicle
                ├── include
                ├── ini
                ├── launch
                ├── scripts
                ├── src
                └── tools

14 directories
- demo folder: Contains demo launch files, users can refer to them to write their own launch files.
Warning Note, the launch files in the demo folder are designed to only start one at a time. Do not launch multiple launch files simultaneously.
- drivers folder: Basic robot driver software, such as charging stations (if any), chassis control, etc.
- urdf folder: Used to store URDF files
- In addition, two other packages were installed via apt:
- ros-$ROS_DISTRO-xpkg-comm responsible for physical communication with the chassis.
- ros-$ROS_DISTRO-xpkg-msgs responsible for providing message types.
If you are not professionally guided, do not modify any packages other than the demo folder.
Using the SDK Package
The package provides a test demo, please refer to Using ROS Demo
Using ROS demo
Pre-launch Check
Tip Please first acquire basic knowledge of
ROS. You can refer to the ROS1 Tutorial and ROS2 Tutorial to understand the common conventions of theROSsystem.
Please ensure the following are completed:
-
ROS-SDK installation is complete; if it is your first time installing the SDK, it is recommended to restart after the first installation.
-
Compilation has been completed without errors.
-
The workspace has been sourced.
-
If using the CAN-COM HUB, ensure the CAN bus is correctly connected and devices can be detected.
- Use lsusb in the terminal to see the following devices.
-
Ensure the remote control is turned off; or if it is on, ensure it is set to CAN mode.
For information about the remote control and modes, please refer to the remote control section in the product user manual.
Chassis Devices
Warning Be cautious, when attempting to control the robot with software for the first time, ensure there are no obstacles within the robot's range of motion, or elevate the robot.
There are two test demos for the chassis:
* demo_basic_ctrl.launch
* demo_key_ctrl.launch
demo_basic_ctrl.launch is a standard launch file that can be used directly with autonomous driving, controlling the robot's movement via the /cmd_vel topic.
demo_key_ctrl.launch supports keyboard control, using turtle_teleop_key to control the robot with the keyboard. If you have not yet seen the ROS turtlesim tutorial, please check it out first.
Tip Note that the movement is not controlled with the arrow keys, please check the usage tips printed in the terminal and press the forward button indicated.
Successful launch will display the following terminal message
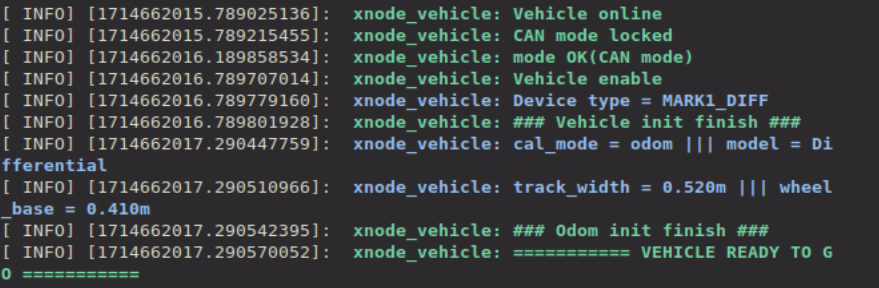
For parameter settings and communication msg in the launch file, please refer to the src/drivers/xpkg_vehicle/README.md file, below are explanations of a few key parameters:
-
calc_speedsets the odometer calculation method,truefor using speed,falsefor using motor encoder values, with the default setting recommended as false. -
mode_can_lockis the CAN mode lock setting,trueforces CAN mode, switching to other modes with the remote control will trigger a warning and wait for recovery, settingfalseallows the user to choose the control mode.
!!!note
If the chassis cannot be controlled, it may be because mode_can_lock is set to false, and it has been switched to another mode.
-
rate_xcontrols the rate multiplier for input speed, 1 is full speed, it is recommended to set it below 0.2 during testing.
After successfully launching the package, you can view ROS topics through rostopic list, below are a few key topics:
- The chassis node sends messages of type
nav_msgs/Odometryto the topic/odom. This message represents the chassis odometer information, including the current pose of the chassis as well as linear and angular velocity information. - The chassis node sends messages of type
tf2_msgs/TFMessageto the topic/tf, which include chassis tf transformation information, to be enabled in launch parameters. - The chassis node subscribes to messages of type
geometry_msgs/Twistfrom the topic/cmd_vel. Upon receiving this message, the chassis moves, wherelinear.x/linear.yrepresent linear velocity, andangular.zrepresents rotational speed.
Rviz Navigation Plugin
This plugin is only compatible with ROS1 version.
Marker Setting

To set the size of the markers for target points, you can adjust the marker scale factor (1.0 is the default value). Remember to click "SET" to refresh all the markers.
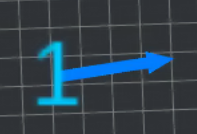
The marker consists of two parts: the numerical part represents the sequence number of the target point, an d the arrow part indicates the stopping direction of the target point.
Add Goal
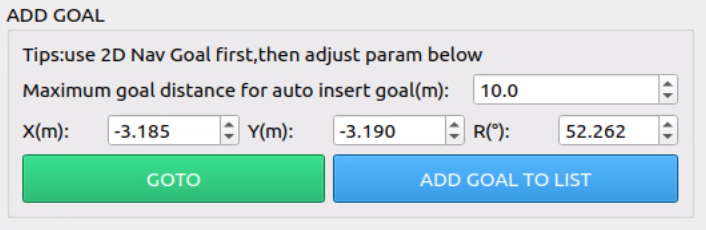
- Please use the built-in functionality of Rviz (
 ) to select the goal point on the map.
 - You can fine-tune the coordinate position by entering the X, Y, and R values.
- If you need to go directly to the goal point, click on the GOTO button.
- If you need to add a goal to the goal list, click on the ADD GOAL TO LIST button.
- If the current goal and the previous goal on the goal list are too far, an intermediate goal point will be automatically inserted in the list. The maximum allowable deviation distance can be modified in the interface shown above, with the default being 10 meters.
Goal List Management
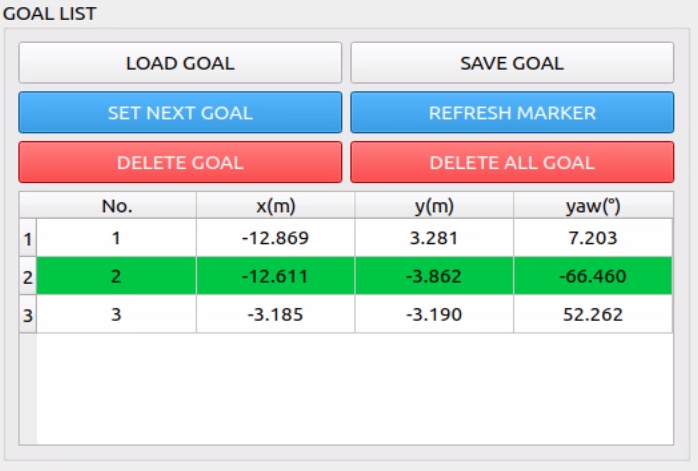
- The added goal points will be displayed in this list, and the parameters in the list can be directly edited. After editing, click the "REFRESH MARKER" button to update all markers.
- The green rows in the list represent the next goal to be executed. To switch to the next goal, select the corresponding row in the list and click the "SET NEXT GOAL" button.
- The "LOAD GOAL" and "SAVE GOAL" buttons are used to save and load the list. The list will be saved in ini/memory.txt and can be directly modified in the document.
- To delete a single goal, select the corresponding row and click the "DELETE GOAL" button.
- To clear the list of goals, click the "DELETE ALL GOAL" button.
Mode Setting
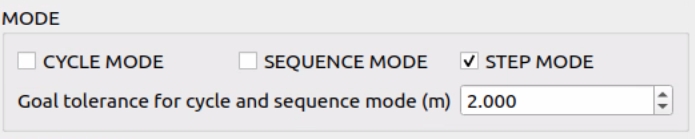
This is used to set execution mode for goal points in the list.
| cycle mode | After executing the last goal point, the system will continue to execute the first goal point. |
| sequence mode | After executing all goal points in the list, the system will stop. |
| step mode | Goals will be executed one by one in the listed order. |
To smooth the path, you can adjust the Goal Tolerance setting. Once the robot enters the radius of this distance from the target point, it will automatically move to the next target point. The smaller the environment, the smaller this value needs to be. This setting does not affect the arrival at the final destination point.
Start Control
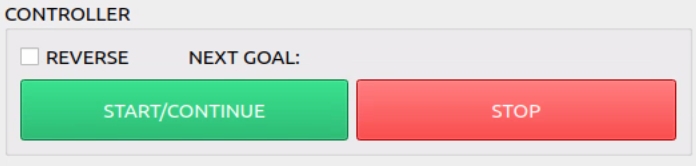
- By default, the list executes the target points from top to bottom. If REVERSE is selected, the target points are executed in reverse order.
- Due to system issues, multiple clicks may be required when using the START and STOP buttons. This control button only affects the goal points in the list. After starting, information about the next goal point will be displayed in the NEXT GOAL.